Big Oil is a two-day heist in PAYDAY 2, contracted by The Elephant. It is a Pro Job, which means failure on either day would immediately terminate the contract. The crew must seize a fusion reactor prototype in order for The Elephant to receive support from oil conglomerates for an upcoming election.
Knowledge of how to complete the heist is particularly important.
Day 1
Assets
")
")
Objectives
- Locate the safe.
- Drill open and find the documents.
- Escape.
Optional objectives
- Locate additional intel.
- Locate additional loot.
The group start outside of the headquarters of the Overkill MC, who are a group of bikers that have access to information on the location of the scientist's villa.
The group must enter the premises and eliminate the bikers, the group can attempt to silently approach the buildings or assault them.
Walkthrough
There are always 12 bikers during the first day of this heist, the bikers are holding onto 3 separate optional assets to assist on Day 2. These assets are located on three tables in the house: the side room connected to the garage via the stairs on the first floor, the second floor landing is right next to a table, and the final piece is located on the balcony. As soon as the bikers are alerted, bikers located near the tables will move toward the table and begin to light the asset on fire. Once the biker starts the animation, you have about 1 second to shoot the biker and prevent the immolation of the asset. On a stealth assault, one could take out all the bikers and collect the intel without losing any. Going loud, a team can assign target zones to each member to take out and control to find the intel.
The often missed point on Day 1 is the massive amount of loot often hidden in the house. This is often where the majority of the mission payout is located. First, to the right of the garage, by the stairs going up into the front room, there is a locked door that can be picked or shot open. Inside of this room, there are a large number of ATM's. One team member should bring the OVE9000 saw in case a high payout is desired. You can also bring an ECM jammer as they can also open ATM's.
Additionally, the front room of the house often contains weapon caches and cocaine, while the top floor can contain more weapon caches and money. These can be collected and returned to your escape van or boat for additional money. If you have alerted the police, then it is best to move the bags to the van as soon as possible before they arrive, otherwise it can cause some trouble moving them to the escape point while been shot at. Additional weapon cases can also appear in the room with ATM's, the balcony and in the 2 sheds at the compound.
Variations
- There can be mines placed around certain areas of the house.
- The fences surrounding the house can be electrified, causing you to be tased on contact. To check if it's the case without alerting the bikers, take out a silenced weapon, face away from the house and move backwards into the fence.
- The doors around the house can be booby trapped with flash bangs. (impossible to tell until door is opened)
- There may be random weapon cases around the house. (same ones seen in Firestarter Day 1)
- There can be a drug deal happening with the Cobra Street Gang in the front of the house. If this happens then there will be 4 bags of cocaine downstairs and 1 bag of money up stairs.
- There are seven distinct pieces of intel (three of them are randomly selected to exist on Day 1):
- Blueprints – A map of Day 2, showing four points of entry.
- Intel (guard) – A picture of two circled guards.
- Intel (codes) – Shutter codes for the house. Note that you can toggle them on or off.
- Intel (scientist) – A picture of the scientist in the lab, Mr. Rossy.
- Intel (engine prototype) – A classified piece of paper indicating which the gas and electrodes the reactor uses.
- Plane keys – Allows the crew to escape via the small plane as soon as the correct reactor is delivered and verified; faster than waiting for the helicopter to return.
- GenSec keycard – Unlocks any of the three possible server rooms; one-time use.
Tips
- Note: Police are only alerted to the sound of gunfire and the saw.
- Shooting a camera causes the biker watching the security cameras to be alerted immediately, as long as bikers in the camera room on the second floor are alive. There is usually another way around if one path to the house has too many cameras. If the camera guy is alerted he will set off the mines surrounding the house but will not alert police. (Police are only alerted to the sound of gunfire and the saw)
- An easy way to stealth this day is to use the Deagle with at least these 3 modifications:
- Standard Issue Suppressor or Monolith
- Extended Mag
- Start from the garage and work your way up through the building clearing each floor fast and carefully. Try not to break any windows as it will alert the other bikers and they will attempt to burn the assets.
- If you are playing on Death Wish, then it is recommended to have Gunslinger aced while using the Deagle. If you cannot get the skill, then use a silenced automatic weapon, like the STRYK 18c, Swedish K, Kobus 90 or SpecOps.
Day 2
Assets
")
(Bain's Guide)
")
(Bain's Guide)
")
(Bain's Guide)
")
")
Cost: XXXX$
")
Cost: XXXX$
")
Cost: XXXX$
")
")
")
(Found at day 1)
")
(Found at day 1)
")
(Found at day 1)
")
(Found at day 1)
")
(Found at day 1)
")
(Found at day 1)
")
(Found at day 1)
Objectives
- Locate the security room.
- Hack the computer. (199 seconds)
- Open the door to the laboratory.
- Pack up the correct fusion reactor.
- Signal the helicopter.
- Take the reactor to the helicopter.
- (If wrong reactor) Wait for helicopter to return and send another reactor.
- (If correct reactor) Escape.
This day is notorious for being very difficult and time-consuming if the crew cannot identify the correct fusion reactor or at least narrow down the number of candidates.
The crew starts outside on a hilltop, and they must gain access to the laboratory within the mansion. To do so, they must access one of three locked security rooms, and hack the system within.
Walkthrough
A stealthy approach is recommended. There can be 5 - 6 guards on day 2. To figure out if there are 6 guards instead of 5, there will be 1 guard standing idle at the front door of the building. There are several cameras scattered around the mansion, each one is viewable on the camera feed asset. The crew may wish to kill 3 or 4 guards to clear the map of guards, leaving only a few left patrolling.
There is exactly one civilian, Mr. Rossy, who is either in the lab, outside the back of the mansion next to the pool or on the far side to the left of the pool, in his office on the second floor next to the server room, or sitting out the front of the mansion on the park bench next to the basketball.
Each security room door can be opened with a drill, OVE9000 saw, three shaped charges, ECM jammer, or a keycard if it was found on Day 1. The system takes 199 seconds to hack. It can take longer if the police are alerted since they will constantly attempt to turn off the power with either of the two randomly placed circuit boxes.
After the hacking is completed, the crew can open the door to the lab, which is in the middle of the first floor. It contains a dozen fusion reactor prototypes, and the crew must find out the correct reactor to deliver (see the section "Finding the correct fusion reactor"). Once a reactor is bagged, a player can signal the extraction helicopter with a flare outside. If the crew did not narrow the number of candidates to one, then they may wish to carry multiple reactors to the extraction zone at once.
The reactor is extremely heavy and slows the carrier down to a crawl, so if the police are at the scene, they will need to be escorted. In this case, it is advised that an Enforcer with defensive skills carries the reactor. If the carrier needs to run, whether it is to recover their armor or to save a downed crew member, they can drop the bag, and resume carrying it later or have a crew member take over.
When the helicopter arrives, the alarm will automatically sound if it has not already. Place the reactor in the helicopter, and Bain will take a few minutes to verify the reactor. During this time, the crew should find a defensible position, such as behind the hill next to the extraction zone, or back in the lab.
If the wrong reactor was delivered, then the crew must repeat the process and extract another reactor. After the correct reactor has been delivered and verified, the crew must either wait for the helicopter to return for extraction, or if the airplane keys were found on Day 1, escape with the airplane near the crew's spawn.
Tips
- If you got the shutter codes intel from Day 1, you can toggle all of the upstairs shutters which covers most of the windows.
- If the shutters are open (random chance), or you got the shutter code intel, it's possible to see into the two upstairs secure rooms to identify the server room (the third is on the main floor and has no windows). You can still see through the sides and bottom of the shutters to identify where the server is even if they are closed.
- If you got the airplane keys intel from Day 1, you can escape immediately after the correct reactor is identified, instead of waiting for the helicopter to return.
- Guards will be alerted if they see the computer being hacked.
Finding the correct fusion reactor
Once you have entered the lab you will be faced with 12 fusion reactor prototypes, and you must determine which one to extract. There are three parts to solving this puzzle; the correct fusion reactor is the one with the correct gas tank color, correct number of nozzles connected to the large blue hydrogen tank, and the correct pressure reading on the gauge.
A tool to help choose an engine based on these parts can be found in the section "Engine layout" (requires JavaScript; mobile-compatible version here).
Color
The correct reactor uses one of three possible gases, matching to a different color gas tank as seen on the whiteboard at the bottom of the stairs in the lab. These colors are always the same.
- Deuterium (blue tank)
- Helium (green tank)
- Nitrogen (yellow tank)
On Day 2, a spiral-bound notebook with one of the gases written on it is randomly placed inside the building (in the lab, or on a table or desk upstairs). It can easily be overlooked if it lies in the lab as it is often in shadows; a tactical light may help to locate and read it.
")
")
Number of nozzles

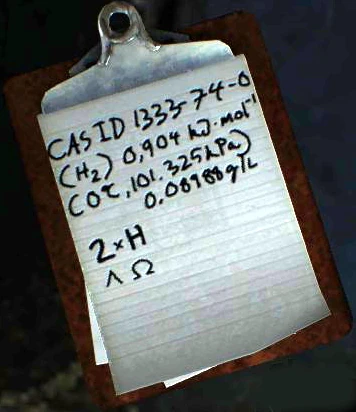
Clipboard indicating that two nozzles are attached
There may be a clipboard in the house or lab with notes that indicate the number of nozzles. Near the bottom of the paper, there is a number or symbol followed by "× H"; a number represents the number of nozzles attached to the reactor, and a lemniscate (∞) represents one nozzle. This note can be found on a table near entry, that room also contains two opened weapon caches.
")
")
")
Pressure

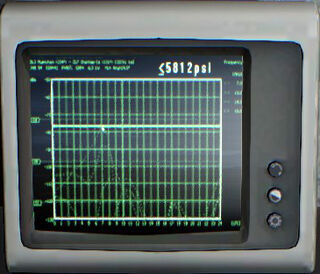
Monitor indicating that the pressure is less than or equal to 5812 psi (401 bar)
Inside the lab are several monitors, one of them displays a psi value at the top-right part of the screen with a "≤" or "≥" symbol. The value should be either 5812 psi (401 bar) or 5783 psi (399 bar).
If the symbol on the monitor is "≤", then the correct fusion reactor's pressure gauge reads less than or equal to the value shown; if "≥", then greater than or equal to the value.
Cold Fusion Research
- Note: As of December 2013, a bug causes "palladium" to always be written on the intel. Thus, this section cannot be used to help identify the correct fusion reactor, and exists only to explain how the intel was intended to be used.
One of the assets you can obtain on Day 1 is the "Cold Fusion Research Paper". Highlighted in pink in the first paragraph is the name of a specific element. This could be palladium (Pd), Titanium (Ti) or Platinum (Pt).
This will match to a whiteboard in the lab. For each row, from left to right, there is a number followed by H (number of nozzles), then inside the next column there will be a chemical equation, headed by one of the gases and the catalyst:
- Platinum (Pt) is added to Helium.
- Titanium (Ti) is added to Nitrogen.
- Palladium (Pd) is added to 2H (Deuterium).
By matching your catalyst to the row, you can determine the number of nozzles and the gases, completely bypassing the usage of clipboards.
(found on Day 1)
")
Engine layout
The following table shows the relative location of each engine and its properties:
- The engine number.
- The color and contents of the gas tank. (Deuterium, Helium or Nitrogen).
- The number of nozzles attached.
- The pressure reading compared to 400 bar. (> is greater than 400, < is less than 400, = is equal to 400)
| Calculator | Whiteboard | |||
|---|---|---|---|---|
| #12 D 3 > |
#7 He 3 < |
Stairs | #2 D 1 > |
#1 N 1 < |
| #10 He 3 = |
#9 D 3 < |
#4 N 2 = |
#3 He 2 = | |
| #8 N 3 < |
#11 N 3 > |
#6 He 2 > |
#5 D 2 < | |
There are two ambiguous cases:
- Helium, two nozzles, and ≥ 5783 psi could be engine 3 or 6.
- Helium, three nozzles, and ≤ 5812 psi could be engine 7 or 10.
If the reactor has only one nozzle, then the element is not required to determine the correct reactor.
- ≤ 5812 psi and one nozzle is engine 1.
- ≥ 5783 psi and one nozzle is engine 2.
Death Wish Mode Changes
Day 1:
- There will randomly be 2 or 3 Titan safes that can spawn with only one containing the needed info, while the others will have a bag of money, a gold bar, or nothing.
- Three extra bikers will also be patrolling outside, leaving you with 15 bikers to deal with.
- The chances of a drug deal happening between the Overkill MC and The Cobras are also increased.
Day 2:
- All cameras will now be replaced with Titan cameras.
- After picking up an Engine, there will now be a chance that you need to place the flare next to the pool side, instead of on the airfield, leaving you open to sniper fire. It is best to put the reactor behind the big seat in the corner of the pool, as the helicopters doors land right next to it.
Bugs
- The Cold Fusion Research intel from Day 1 always says the catalyst "Palladium" even when it's not, and thus can't be used to identify the engine.
- On console, in Day 1. There is a small chance that after one grabs the intel on the first floor, the bikers will still burn the table it was on and the player can grab the intel again from the fire; this makes it possible to acquire four intel assets for Day 2.
- On console the air plane keys can still be grabbed after they stop burning, thus making it guaranteed that they can be grabbed. On PC the air plane keys will sometimes be retrievable from an extinguished intel pile on either the first or second floors.
- On console, if you spawn behind the shed, there is a small chance that a camera will see you if you have more than 1 person.
Achievements

|
I Knew What I Did Was Wrong On day 1 of the Big Oil job, enter the basement, open the ATM machines and take the loot. |

|
Doctor Fantastic On day 2 of the Big Oil job, complete the heist with the first engine being correct. |

|
Dr. Miserable On day 2 of the Big Oil job, complete the heist with the last engine being correct on the OVERKILL difficulty or above. |

|
Changing the World... Complete the Big Oil pro job on the Death Wish difficulty. |
Trivia
- Big Oil is internally referred to as "Welcome to the Jungle".
- Some players are reporting a mysterious message which may pop up during the first day of the heist saying: "Take the key from Chavez" a reference from the "Panic Room" from the first game. Also, if the "Alex Ammo Drop" asset has been bought on day 2, Bain will refer to the "Panic Room" heist from the heist.
- On the balcony there is a radio that plays any song from the first game.
- On Day 2. There used to be a keypad at the back of the house that you could use, if you had found the Shutter Codes from Day 1. When activated, it would bring down shutters that would block off the entire back part of the building, leaving the only way in and out through the first floor doors and windows.